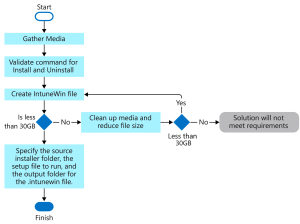
To package a Win32 app for Intune upload, use the Microsoft Win32 Content Prep Tool to convert the app content into the .intunewin format, which is the required file format for uploading into Intune. This tool will also zip all files and subfolders, and it’s important to keep the tool separate from the installer files to avoid including it in the .intunewin file.
Process flow to create a .intunewin file (Img Src: Microsoft Learn)

Steps for packaging applications
There are different ways to package the app using IntuneWinAppUtil.exe. You can use any method. I have mentioned here the method that I normally use.
- Run PowerShell with administrator privileges
- Change Directory where the packaging tool is located
- Run the tool
- PS C:\Users\AB\Documents\Intune> .\IntuneWinAppUtil.exe
- Please specify the source folder: MSI – Folder where all your installer files are located
- Please specify the setup file: googlechromestandaloneenterprise64.msi – Installer file name
- Please specify the output folder: PACKAGES – Folder where you want to put the Intune package
I have attached the following screenshot as a reference. The time consumed during packaging is based on the size of the installer.
To run the packaging tool, follow the instructions provided

Successful creation of package

Validation of package creation

The package is ready for Intune upload
Refer to this article for upload and deploy the created package: https://sysopsinsiders.com/upload-and-deploy-win32-application-using-microsoft-intune/